Elearning storyboarding: How to plan engaging online courses (free template)
8 minute read
Today, elearning is easier to produce than ever before; authoring tools like Elucidat are simplifying the build process and empowering novices to do the jobs once confined to tech-savy developers. With Subject Matter Experts (SMEs) now able to work directly into these tools, you might wonder: Is it time to ditch the elearning storyboard?

Table of contents
What is an elearning storyboard?
An elearning storyboard is the blueprint for an online course or other piece of digital learning. It provides a detailed breakdown of the content, including a description of the interactions and multimedia to be used, along with the actual words to appear on screen (and in any video or audio you plan to create). Whoever builds your course – whether an SME, instructional designer, or developer – will do so using the storyboard as guidance.
Why use storyboards in elearning development?
Though storyboards might seem redundant to someone not au fait with instructional design, they actually serve several key functions:
- Providing a holistic view of the learning experience: Whilst it’s easy to get bogged down with visual and technical details when working inside an authoring tool, a course content storyboard helps you focus on the bigger picture…Does the narrative flow make sense? Have you covered all the essential learning messages? Will each page be interactive enough? These questions need considering before you think about details like how your content will transition on screen.
- Managing scope: Planning out content ahead of building helps you establish how long each section should take your learners and whether anything needs tightening up.
- Outlining your visual approach: A visual storyboard for elearning will serve as a reference for your graphic artists, animators, or videographers to work from later, so they can bring your ideas to life.
- Ensuring stakeholder alignment: Some authoring tools limit the number of reviewers that can access your draft course or make it difficult for them to leave comments in situ. Conversely, a storyboard can be easily shared, annotated and tweaked by all relevant stakeholders. (However, with collaborative tools like Elucidat now leading the way for course creation, it’s becoming much easier to refine your built courses as part of a team.)
- Saving resources: Even with the most efficient authoring tool, it takes time to populate a course, sometimes requiring support from graphic artists and developers. Providing the opportunity for your course reviewers to edit content at the storyboard stage means less time is wasted down the line.
- It improves course quality: Working in a storyboard encourages you to think carefully about things like wording and storytelling, whilst providing an early opportunity for your QA team to review your content – all of which equate to a quality end-product.
- It promotes careful multimedia planning: Storyboards are an opportunity to script your video drama, vox-pops, animations, and/or voiceover, which need careful consideration and sign-off before you start recording.
You can explore the rationale for elearning storyboards further in this blog post from the elearning industry.
Key components of an effective elearning storyboard
Even with a powerful authoring tool up your sleeve, a shoddy storyboard will leave you with, at best, a confusing learning experience. So, what should you include in yours?
- A course menu and/or introductory screen, which might include completion instructions.
- A clear outline of the course structure, with content sectioned into topics, pages, interactions, and display items.
- Expected durations (in minutes) for each section of content.
- A description of what interactions you plan to use and what options there are within these. For instance, if you decide to include a multiple-choice question, what are the possible answers? How many are correct? How many versions of feedback are there?
- The exact text that will appear on screen. This includes page headings, body text, instructions, and any accessibility aids (for example, alt text).
- The script for any video or audio elements that need recording, such as the dialogue for video drama or the voiceover for animation.
- A rough plan of the visual assets. You might include links to existing photos, or if you want a new asset creating, a sketch that your graphic artist can use as a reference.
- Direction on how learners will navigate the content, such as how they will get from one page to another.
- Links to any resources you want to embed.
Step-by-step guide to creating a storyboard
Use these 10 steps as guidance for constructing your elearning storyboard:
- First, agree your learning objectives with your team. These are your bottom line – everything that goes into your course should be based on these.
- Create a course outline to structure your initial ideas. Paving the way for your storyboard, this is a much higher-level plan of your course, mapping out what content will appear where and with what creative treatment. (Essentially, it helps you structure your content and ensure you’re delivering against your learning objectives, without worrying about specific wording.)
- Choose an authoring tool that will support your design. There is a wealth of information out there to help you pick! You can start here.
- Choose a storyboard format. This could be a template in Word, PowerPoint, or some other application but, if possible, use one that your L&D team are already familiar with.
- Write your copy, including on-screen text, audio, and video, clearly, concisely and in line with your brand voice. This is where most of your efforts will be expended. To get started, you can find guidance on best practices here.
- Include references for what visuals you’d like to see alongside each section of text. In fact, you’d ideally determine these things in parallel, as they should influence each other. For example, by using a diagram to convey a complex process, you can swap out that waffly paragraph of text!
- If handing over to a developer and/or graphic artist, add any notes that will make their life easier… If an infographic needs creating, what graphic style should it have? What should it highlight? How will learners interact with it?
- Give everything a readthrough to check that the copy flows, that there’s a consistent tone of voice, and that your word counts are reasonable.
- Review and iterate with your wider team of SMEs and ideally, your QA team.
- Brief your graphics team so they can source the necessary assets, then move into development using your storyboard and chosen authoring tool.
For further guidance on developing effective learning, take a look at this blog post on creating engaging content.
Common mistakes to avoid
Here are some common pitfalls we see when it comes to storyboarding:
- Skipping the storyboard entirely: When deadlines are tight, it can be tempting to go full steam ahead into the build, with just your learning objectives for direction. However, this will nearly always lead to quality problems later when you realize you’ve overlooked key learning messages, or your content order doesn’t make sense. (And it typically takes much longer to rework a build than a storyboard document!) That being said, it’s worth highlighting that Elucidat provides a flexible way for confident SMEs to storyboard in situ; The authoring interface allows you to see your course pages and chapters from a single top-level view, where you can easily change your interactions and locations. Find out more in this feature focus.
- Not using a template or consistent format: Page elements will get muddled during the build stage if they aren’t clearly identified. For example, your course could end up with missing page titles or text that appears alongside the wrong images.
- Including too much copy: Generally speaking, the more reviewers involved, the greater the risk of last-minute content being shoehorned into your storyboard. So, collaborate with your reviewers to keep the text as tight as possible…If in doubt, cut it out!
- Ignoring the learner’s perspective: Remember to put yourself in your learners’ shoes and consider how, when, and where they will be accessing your content. If you have mobile learners, don’t include interactions that will be clunky to navigate on a smartphone. And if you have some learners who can’t view video content, make sure you add transcriptions. Find out more about how to support accessibility requirements here.
- Not establishing a consistent writing style: Make sure you have agreed upon a suitable tone of voice from the get-go, so your content doesn’t jump around from colloquialisms to policy speak, for example.
- Ignoring brand guidelines: Keep your brand guardians happy by writing according to your organization’s guidelines. If you don’t have any, establish your own conventions early on for things like capitalizations and bullet points. Oversights and inconsistencies can come back to bite you later!
Real examples of elearning storyboards
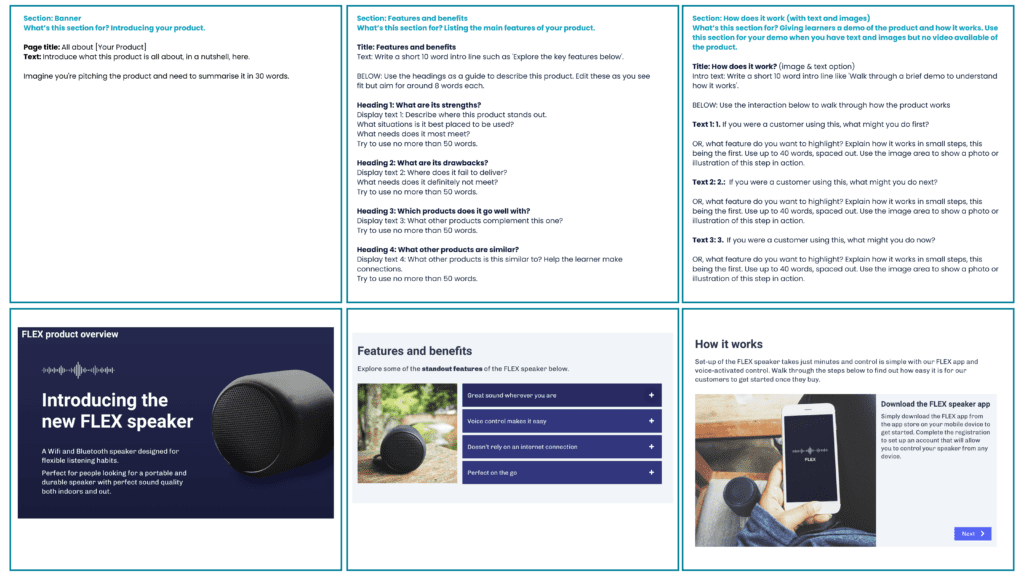
You can find an elearning storyboard example here. This template is specifically designed for drafting microlearning and includes instructions for completing each section.
Here are some key features in this document:
- It starts with a snapshot of how the course will fit together – in this case, as a single scrolling page.
- There’s a column dedicated to the visual direction for each section. This has been populated with mock-ups for each type of interaction, but you could also use this space for sketches, example photos, or even just descriptions of what you’d like to see in the build.
- Placeholder headings for each interaction have been included.
- There’s consistent formatting throughout the document, for example, on-screen text is on the left, visuals are on the right, and headings are picked out in bold.
- There’s guidance around word count for each section, to ensure everything will fit nicely on screen.
- There are placeholders for instructional text on interactive page elements. Remember, these should be completed with mobile users in mind (for some authoring tools, this might require two types of instruction).
- It incorporates all possible learning journeys, for example, offering different feedback text depending on how the learners answer a multiple-choice question.
You can see an example of how this template translates into a course build here.

Final thoughts
When it comes to building an elearning course, off-the-cuff usually equates to off-the-mark. So, plan your course carefully and save time in the long run by using a storyboard for instructional design.
And if you do feel confident enough to skip this phase of development, use an authoring tool like Elucidat that enables you to storyboard flexibly in situ.
Download your free storyboard template
Download a blank elearning storyboard template for you and your team here. We use it on all of our projects!
To learn more about creating engaging elearning prior to, throughout, and after the storyboarding phase, take a look at this guide.
Interested in a free elearning design course? Check out this engaging elearning course, built in Elucidat.


